
Understanding MVC pattern in Nodejs

I am a Software Developer with over 6 years of experience, I have a great passion for technology and software development. I love to work with the latest technologies, with a preference for Javascript, Nodejs, Golang, React, Redux, and MongoDB. I have experience working with teams and finds clear communication important. I am always open to learning new technologies.
This is part two of the Test-driven Development with Nodejs, Express, Mongoose & Jest, in part one, we set up our development environment and ran our first test. In this tutorial, we will focus on building the endpoints using the MVC Architecture.
Definition of terms
MVC - Model View Controler
Model View Controller is a software architectural pattern that involves the separation of the application logic into three interconnected elements the Model, View, and Controller.
Restful API
REST is an acronym for Representation State Transfer, API on the other hand is an acronym for Application Programme Interface. A RESTful API is an architectural style for an application program interface (API) that uses HTTP requests to access and use data.
I surmised you are familiar with the terms involved in this tutorial. Let's get started.
In the previous tutorial, we had a very basic folder structure, with few dependencies. Let's install the required dependencies for our API development.
$ npm i --save-dev body-parser dotenv nodemon
After installation, your package.json file should look like the one below.
{
  "name": "tdd-with-nodejs",
  "version": "1.0.0",
  "description": "",
  "main": "index.js",
  "scripts": {
    "test": "jest",
    "start": "nodemon index.js"
  },
  "keywords": [],
  "author": "",
  "license": "ISC",
  "devDependencies": {
    "body-parser": "^1.19.0",
    "dotenv": "^8.2.0",
    "express": "^4.17.1",
    "jest": "^26.6.3",
    "mongoose": "^5.11.9",
    "nodemon": "^2.0.6"
  }
}
You notice we have configured our initialization script to run with nodemon, nodemon will keep track of every change made to our index.js file and refresh our application accordingly. Next, Let's set up a server. create a new file within the root directory of your application named index.js and paste the code below.
require('dotenv').config();
const mongoose =  require("mongoose");
//const articles = require("./routes/article.routes");
const bodyParser =  require("body-parser");

const app = exepress();
const port = 8000;

mongoose.connect(process.env.mongoURI, {useNewUrlParser: true, useCreateIndex: true, useUnifiedTopology: true })
.then(res => console.log(`Connection Succesful ${res}`))
.catch(err => console.log(`Error in DB connection ${err}`));

//body-parser config;
app.use(exepress.json());
app.use(bodyParser.urlencoded({extended: true }));
app.use(bodyParser.json());

app.get("/", (req, res) => {
    res.send(`<h1>Hello!</h1>`)
});

app.listen(port, () => {
    console.log(`Application is listening at port ${port}`);
});

//register the enpoints
//app.use("/api/v1/articles", articles);
Don't forget to create a .env file and add your database URI like so: mongoURI=mongodb+srv://your-db-uri. Next, start the application by typing the command below on your terminal.
$ npm run start
You should get a response on your terminal that reads: Application is listening at port 8000 & Connection Succesful [object Object]. If you open http://localhost:8000 you should get "Hello!" logged to your screen as well.
This tutorial intends to teach you how to properly structure your Nodjs application to fit into the MVC pattern, so, we would be separating our business logic from our controller and routes files. We will learn more about this in the Layered Structure tutorial which is the final tutorial for this series.
Building the Model (Article.js)
Next, let's create our Model. Create a new folder within the root directory of the project, navigate into the folder, and create a new file named Article.js, and copy-paste the code below to create the model for our API.
const mongoose = require("mongoose");
const Schema = mongoose.Schema;


const articleSchema = Schema({

    title:{
        type: String,
        required: true,
    },

    body:{
        type: String,
        required: true,
    },

    article_image: {
        type: String,
        required: false,
    },

    date:{
        type: Date,
        default: Date.now(),
    }

});


module.exports = Article = mongoose.model("Article", articleSchema);
Our model is very basic, it has a title``,body, anddateobject. You can learn more about buildingMongoDB``` Schemas using Mongoose by reading the official doc here.
Building the Article Service (ArticleService.js)
To build the ArticleService.js you need to create a folder named services to house our ArticleService.js file. Copy-paste the code below into your ArticleService.js.
const Article = require("../models/Article");

module.exports = class ArticleService{
    static async getAllArticles(){
        try {
            const allArticles = await  Article.find();
            return allArticles;
        } catch (error) {
            console.log(`Could not fetch articles ${error}`)
        }
    }

    static async createArticle(data){
        try {

            const newArticle = {
                title: data.title,
                body: data.body,
                article_image: data.article_image
            }
           const response = await new Article(newArticle).save();
           return response;
        } catch (error) {
            console.log(error);
        }

    }
    static async getArticlebyId(articleId){
        try {
            const singleArticleResponse =  await Article.findById({_id: articleId});
            return singleArticleResponse;
        } catch (error) {
            console.log(`Article not found. ${error}`)
        }
    }

    static async updateArticle(title, body, articleImage){
            try {
                const updateResponse =  await Article.updateOne(
                    {title, body, articleImage},
                    {$set: {date: new Date.now()}});

                    return updateResponse;
            } catch (error) {
                console.log(`Could not update Article ${error}` );

        }
    }

    static async deleteArticle(articleId){
        try {
            const deletedResponse = await Article.findOneAndDelete(articleId);
            return deletedResponse;
        } catch (error) {
            console.log(`Could  ot delete article ${error}`);
        }

    }
}
Building the controller (article.controller.js)
Next, lets' start writing our API endpoints, create a new folder within your root directory named controllers, navigate into the folder, and create a new file named article.controller.js. copy-paste the code below.
const ArticleService = require("../services/ArticleService");

module.exports = class Article{

   static async apiGetAllArticles(req, res, next){
       try {
         const articles = await ArticleService.getAllArticles();
         if(!articles){
            res.status(404).json("There are no article published yet!")
         }
         res.json(articles);
       } catch (error) {
          res.status(500).json({error: error})
       }

   }

   static async apiGetArticleById(req, res, next){
      try {
         let id = req.params.id || {};
         const article = await ArticleService.getArticlebyId(id);
         res.json(article);
      } catch (error) {
         res.status(500).json({error: error})
      }
   }

   static async apiCreateArticle(req, res, next){
      try {
         const createdArticle =  await ArticleService.createArticle(req.body);
         res.json(createdArticle);
      } catch (error) {
         res.status(500).json({error: error});
      }
   }

   static async apiUpdateArticle(req, res, next){
      try {
         const comment = {}
         comment.title        = req.body.title;
         comment.body         = req.body.body;
         comment.articleImage = req.body.article_image

         const updatedArticle = await ArticleService.updateArticle(comment);

         if(updatedArticle.modifiedCount === 0){
            throw new Error("Unable to update article, error occord");
         }

         res.json(updatedArticle);

      } catch (error) {
         res.status(500).json({error: error});
      }
   }

   static async apiDeleteArticle(req, res, next){
         try {
            const articleId = req.params.id;
            const deleteResponse =  await ArticleService.deleteArticle(articleId)
            res.json(deleteResponse);
         } catch (error) {
            res.status(500).json({error: error})
         }
   }

}
Building the routes (article.routes.js)
To communicate with our endpoints we need to set up our routes with corresponding requests. Create a new folder named routes, inside the folder, create a new file named article.routes.js. You can choose to name the folder whatever you like but it is always nice to maintain meaningful directory and file names.
const  express =  require("express");
const router = express.Router();
const ArticleCtrl = require("../controllers/article.controller");


router.get("/", ArticleCtrl.apiGetAllArticles);
router.post("/", ArticleCtrl.apiCreateArticle);
router.get("/article/:id", ArticleCtrl.apiGetArticleById);
router.put("/article/:id", ArticleCtrl.apiUpdateArticle);
router.delete("/article/:id", ArticleCtrl.apiDeleteArticle);

module.exports =  router;
If you've followed the tutorial up to this point, your folder structure should actually look like the snippet below.
├── tdd-with-nodejs
 ├── controllers
     ├── article.controller.js
 ├── models
     ├── Article.js
 ├── routes
     ├── article.routes.js
 ├── services
     ├── articleService.js
├── test
Putting it all together
When working with the MVC pattern always ensure you maintain the Separation of Concern (SoC) technique. Separation of concerns (SoC) is a design principle for separating software applications into distinct sections such that each section addresses a separate concern. A concern is a set of information that affects the code of a Software Application. We will dive deeper into this topic in the next tutorial which is the last for this series.
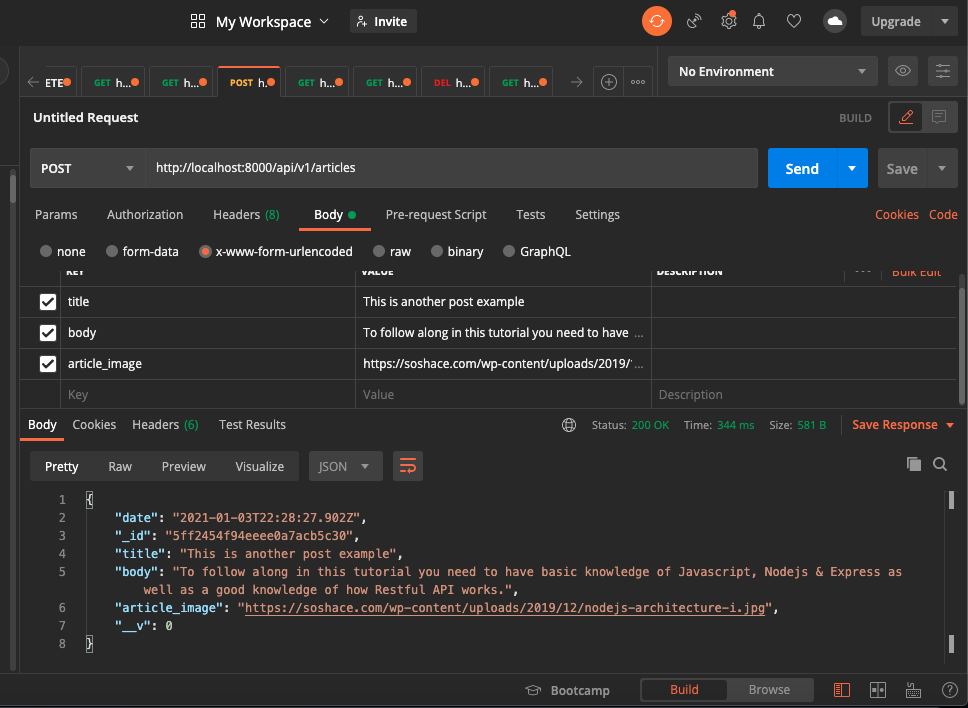
Before we conclude let's test one of the endpoints. Send a POST request to the/api/v1/articles endpoint using an API testing tool of your choice. In my case, Postman You should get the response object as a response for your newly created article similar to the snippet below.
That's all for this tutorial. congratulations on making it thus far in this series. See you in the next tutorial.


